이 글의 코드 및 정보들은 강의를 들으며 정리한 내용을 토대로 작성하였습니다.
Environment Profile
-
테스트 환경에서는 A Bean을 사용하고
-
실제 환경에서는 B Bean을 사용하고 싶을 경우
-
Profile로 설정이 가능하다.
-
그리고 이런 Profile 설정을
-
ApplicationContext가
-
extends하는
-
EnvironmentCapable 클래스에서 지원해준다.
ApplicationContext.class
public interface ApplicationContext extends EnvironmentCapable, ... {
    ...
}
EnvironmentCapable.class
public interface EnvironmentCapable {
    Environment getEnvironment();
}
Profile 설정
- 크게 2가지로 나눠서 생각할 수 있다.
-
Configuration 파일을 사용하여 관리하는 방법
-
Bean에 Profile 설정하는 방법
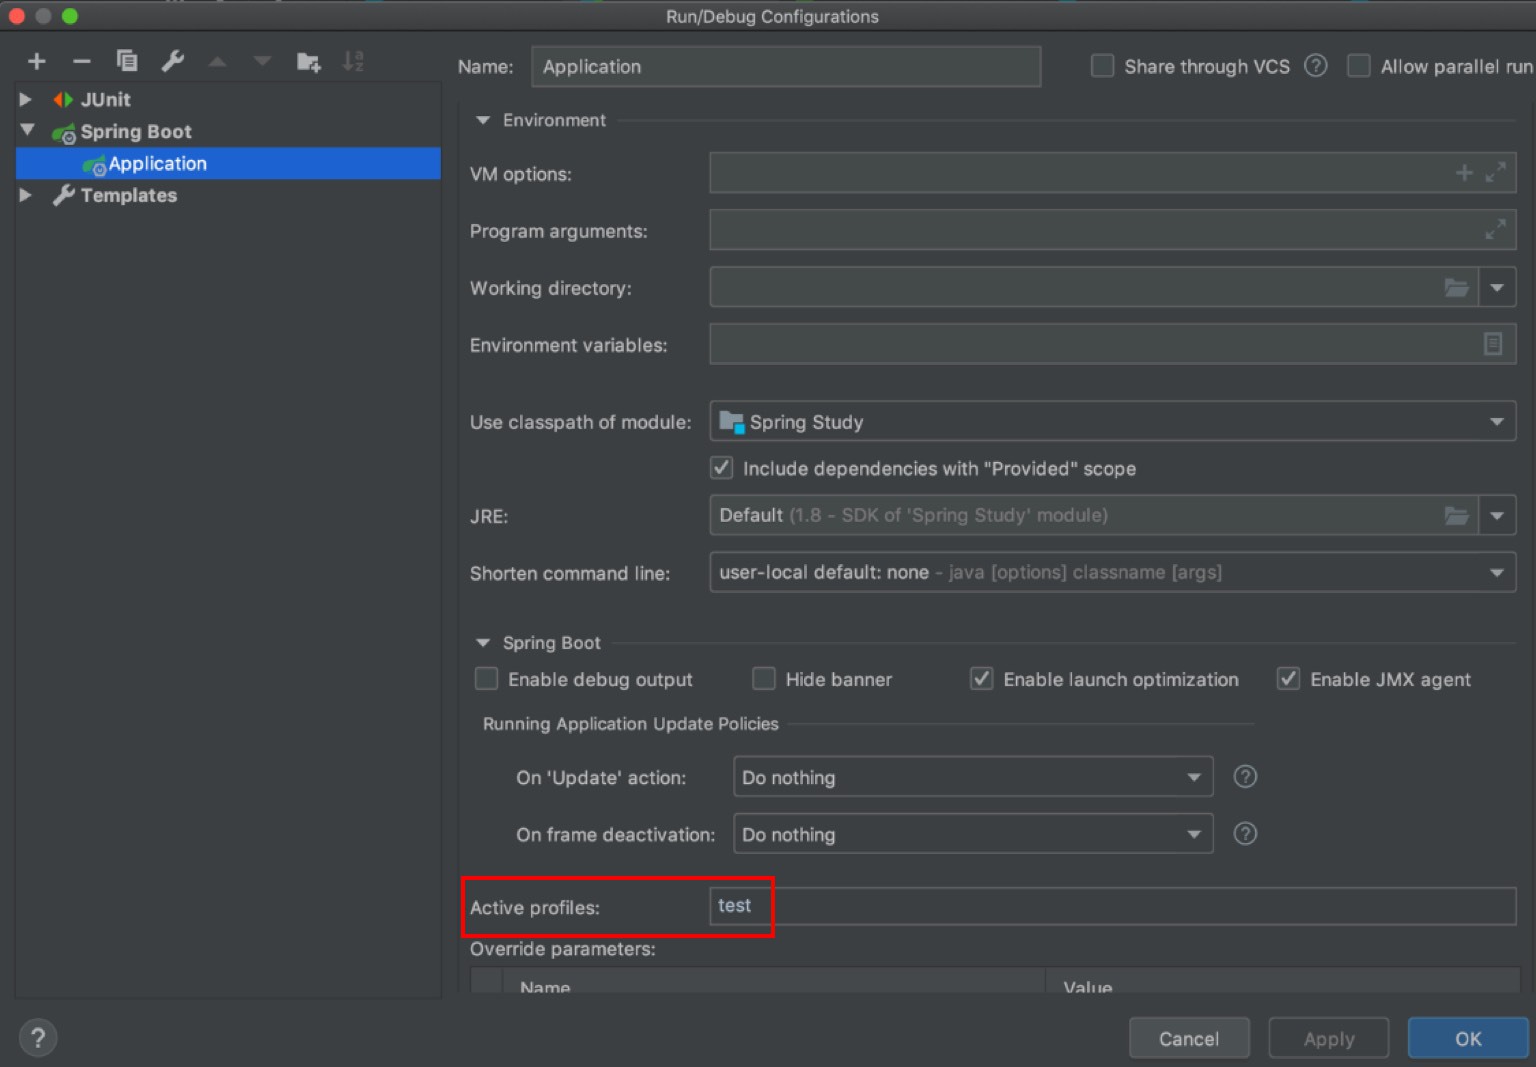
IDE 도움
Configuration 파일을 사용하여 관리하는 방법
-
Active Profiles 필드에
-
사용하려는 Profile 이름을 명시해준다.

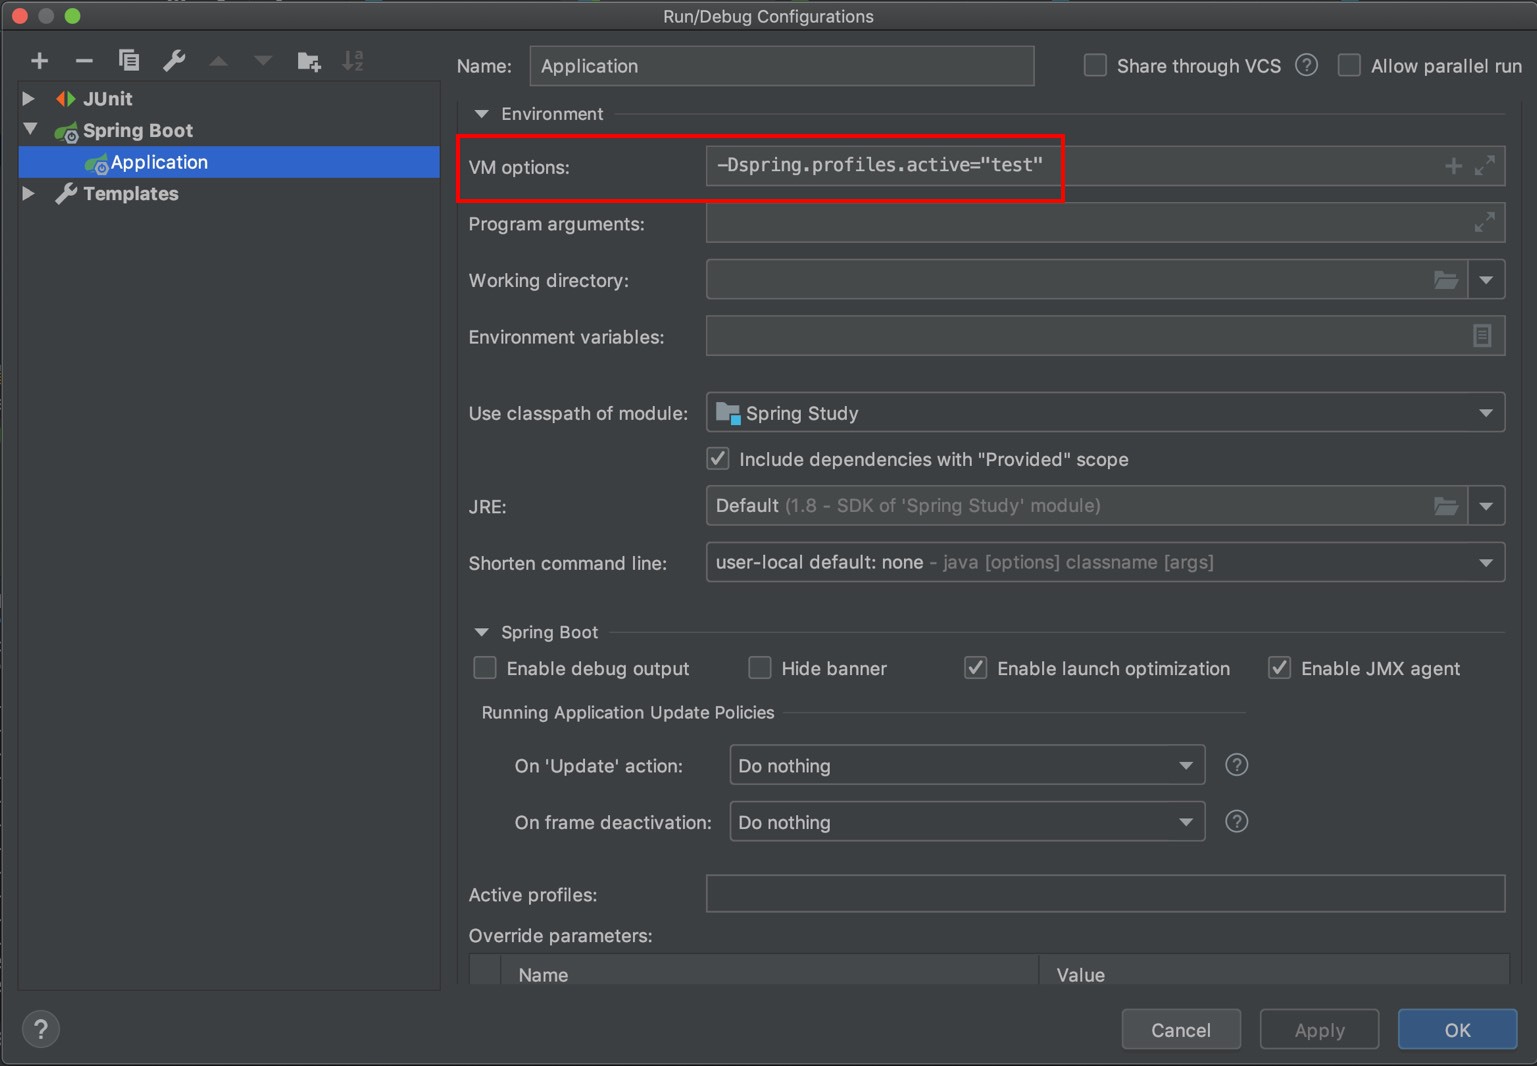
VM Option
Configuration 파일을 사용하여 관리하는 방법
-Dspirng.profiles.active="test"

Bean 설정
Bean에 Profile 설정하는 방법
-
위 2가지 방법은
-
(IDE 도움, VM Option)
-
Configuration 파일에
-
일일이 선언을 해줘야하기 때문에
-
매우 번거롭다.
-
그런 수고를 덜기 위해
-
Bean에 Profile을 설정하는 법을 알아보자.
-
방법은 매우 심플하다.
-
@Profile 애노테이션을 사용하면 된다.
Repository
@Repository
@Profile("test")
public class TestBookRepository implements BookRespository {
}
Profile 표현식
-
Profile 설정을 하는데
-
다양한 표현식이 가능하다.
@Repository

@Profile("beta")
@Profile("!beta")
@Profile("beta & real")

public class TestBookRepository implements BookRespository {
}
-
[1] : Beta 환경에서 사용
-
[2] : Beta 환경이 아닌 경우에 사용
-
[3] : Beta & real 환경에서 사용
Example Code
-
Profile 설정 유무에 따른
-
코드의 결과값을 보자.
Fail Code
-
test 라는 Profile을 사용하기 위한
-
어떠한 설정도 되어있지 않은
-
상황에서 코드를 실행시킨 경우다.
Repository
public interface BookRespository {
}
public class TestBookRepository implements BookRespository {
}
Configuration
@Configuration
@Profile("test")
public class TestConfiguration {

    @Bean
    public BookRespository bookRespository(){
        return new TestBookRepository();
    }
}
-
test라는 Profile을 사용할 경우에만 동작한다.
-
하지만 설정이 되어 있지 않기 때문에
-
해당 Config 파일을 참조하지 못한다.
AppRunner
@Component
public class AppRunner implements ApplicationRunner {

    @Autowired
    ApplicationContext ctx;

    @Autowired
    BookRespository bookRespository;

    @Override
    public void run(ApplicationArguments args) throws Exception {
        Environment environment = ctx.getEnvironment();
        System.out.println(Arrays.toString(environment.getActiveProfiles()));
        System.out.println(Arrays.toString(environment.getDefaultProfiles()));
    }
}
Result
***************************
APPLICATION FAILED TO START
***************************

Description:

Field bookRespository in goodgid.study.spring.AppRunner required a bean of type 'goodgid.study.spring.BookRespository' that could not be found.

The injection point has the following annotations:
	- @org.springframework.beans.factory.annotation.Autowired(required=true)


Action:

Consider defining a bean of type 'goodgid.study.spring.BookRespository' in your configuration.
-
test라는 Profile을 사용하지 않았기 때문에
-
bookRespository를 주입받지 못한다.
Success Code
-
위에서 언급한 방법들 중
-
(= IDE 도움, VM Option, Bean 설정)
-
편한 방법으로
-
Profile을 지정한 후
-
Application을 실행시키면
-
정상적으로 구동되는 것을
-
확인할 수 있다.
AppRunner
@Component
public class AppRunner implements ApplicationRunner {

    @Autowired
    ApplicationContext ctx;

    @Override
    public void run(ApplicationArguments args) throws Exception {
        /*
        ApplicationContext 클래스는
        EnvironmentCapable을 extends한 상태이다.
        */
        Environment environment = ctx.getEnvironment();
        // 현재 Active되어 있는 Profile들을 갖고 온다.
        System.out.println(Arrays.toString(environment.getActiveProfiles())); // [1]
        // Default로 설정되어 있는 Profile들을 갖고 온다.
        System.out.println(Arrays.toString(environment.getDefaultProfiles()));
    }
}
Result
[test] // [1]
[default]
-
사용하기로 명시했던
-
Profile인 test가
-
environment.getActiveProfiles()의 결과값으로 // [1]
-
출력된다.
Summary
-
개발 환경에 따른
-
Profile을 따로 가져가고 싶은 경우
-
크게 2가지 방법으로 설정하는 방법에 대해 알아봤다.
-
Configuration 파일을 사용하여 관리하는 방법
-
Bean에 Profile 설정하는 방법
- 또한 Profile 표현식에 대해서도 알아봤다.
-
그리고 마지막에는
-
코드를 통해
-
Profile을 설정하는 법과
-
설정하지 않았을 경우 어떤 결과가 나오는지 확인하였다.