이 글의 코드 및 정보들은 강의를 들으며 정리한 내용을 토대로 작성하였습니다.
Resource Handler
-
Resource Handler란
-
정적인 Resource를 처리하기 위해 사용되는 Handler이다.
-
기본적으로
-
Servlet Container(톰캣, 제티, 언더토우 등등)에는
-
정적인 자원을 처리할 수 있는
-
Default Servlet이 등록되어 있다.
-
그렇기 때문에
-
프로젝트를 생성하고
-
아무 설정을 하지 않더라도
-
Resource 요청을 하면
-
동작이 된다.
-
만약 특정 요청에 대한
-
Resource를 Control할 필요가 있다면
-
Resource Handler를 정의해서
-
Config에 등록해줘야한다.
Code
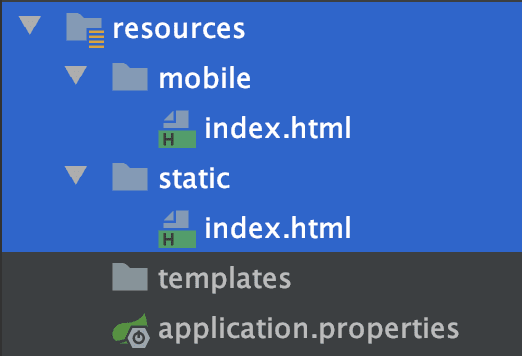
Project Directory
-
스프링 부트 환경에서
-
프로젝트를 생성하면
-
Resource의 Directory는 다음과 같다.
-
static Directory는
-
프로젝트를 생성하면
-
자동으로 생기는 Directory이다.
-
그리고 mobile Directory는
-
테스트를 위해 생성한 Directory이다.
mobile/index.html
<!DOCTYPE html>
<html lang="en">
<head>
  <meta charset="UTF-8">
  <title>Title</title>
</head>
<body>
<h1>hello mobile</h1>
</body>
</html>
static/index.html
<!DOCTYPE html>
<html lang="en">
<head>
  <meta charset="UTF-8">
  <title>Title</title>
</head>
<body>
<h1>hello index</h1>
</body>
</html>
Config
WebConfig
@Configuration
public class WebConfig implements WebMvcConfigurer {
    @Override
    public void addResourceHandlers(ResourceHandlerRegistry registry) {
        registry.addResourceHandler("/mobile/**")
                .addResourceLocations("classpath:/mobile/")
                .setCacheControl(CacheControl.maxAge(10, TimeUnit.MINUTES));
    }
}
-
WebConfi에
-
원하는 옵션과 설정으로
-
ResourceHandler를 등록한다.
Test Code
SimpleControllerTest
@RunWith(SpringRunner.class)
@SpringBootTest
@AutoConfigureMockMvc
class SimpleControllerTest {

    @Autowired
    MockMvc mockMvc;

    @Test
    public void defaultStatic() throws Exception {
        this.mockMvc.perform(MockMvcRequestBuilders.get("/index.html"))
                    .andDo(print())
                    .andExpect(status().isOk())
                    .andExpect(content().string(Matchers.containsString("hello index")));
    }

    @Test
    public void customStatic() throws Exception {
        this.mockMvc.perform(MockMvcRequestBuilders.get("/mobile/index.html"))
                    .andDo(print())
                    .andExpect(status().isOk())
                    .andExpect(content().string(Matchers.containsString("hello mobile")))
                    .andExpect(header().exists(HttpHeaders.CACHE_CONTROL));
    }

}
-
defaultStatic 메소드는
-
Servlet Container의
-
Default Servlet을 사용한다.
-
customStatic 메소드는
-
등록한 Resource Handler를 사용한다.
customStatic()의 Response
MockHttpServletResponse:
           Status = 200
    Error message = null
          Headers = [
              Vary:"Origin",
              "Access-Control-Request-Method",
              "Access-Control-Request-Headers",
              Last-Modified:"Thu, 16 Jan 2020 23:44:38 GMT",

              <!--  설정했던 Cache 값이 나온다. -->
              Cache-Control:"max-age=600",

              Content-Length:"142",
              Content-Type:"text/html",
              Accept-Ranges:"bytes"
              ]
     Content type = text/html
             Body = <!DOCTYPE html>
<html lang="en">
<head>
  <meta charset="UTF-8">
  <title>Title</title>
</head>
<body>

<h1>hello mobile</h1>

</body>
</html>
    Forwarded URL = null
   Redirected URL = null
          Cookies = []
-
Resource Handler를 등록할 때
-
설정했던 Cache값이
-
Response의 Headers에 담겨온다.
Summary
-
Resource Handler의 개념에 대해 알아봤다.
-
Resource Handler 개념을 작 숙지하고 이해하여
-
정적인 Resource를 Control 해야하는 상황에서
-
Resource Handler 개념을 활용하도록 하자.