꾸준함이 실력입니다.
One Two be super Developer-
Macbook 사용 시 내가 사용하는 프로그램 및 환경 설정 기록해두기
Prologue
-
새로운 장비를 구매하면
가장 어려운 게 기존 장비랑 같게 환경 세팅을 하는 것이다.
-
100% 싱크를 맞추고 싶은데
기억에만 의존하면 쉽지 않고 생각보다 시간이 오래 걸리므로
이번 기회에 신규 장비를 구매 시 어떤 설정과 설치를 해야 하는지 기록해두려고 한다.
-
-
vim 모드에서 해당 파일의 모든 텍스트(Text)를 클립 보드(Clipboard)에 복사하기 !
Prologue
-
vim 모드에서 작업을 하다 보면
전체 파일 내용을 클립보드로 복사할 필요가 은근 많이 있다.
-
이때 cmd + a 로 복사를 하게 되면
지금까지 입력했던 명령어들까지 같이 복사되면서
추가 작업이 필요해졌고 이건 너무나 비효율적이다 생각이 되어
Stack Overflow에서 다음과 같은 글을 찾아 해결했다.
-
-
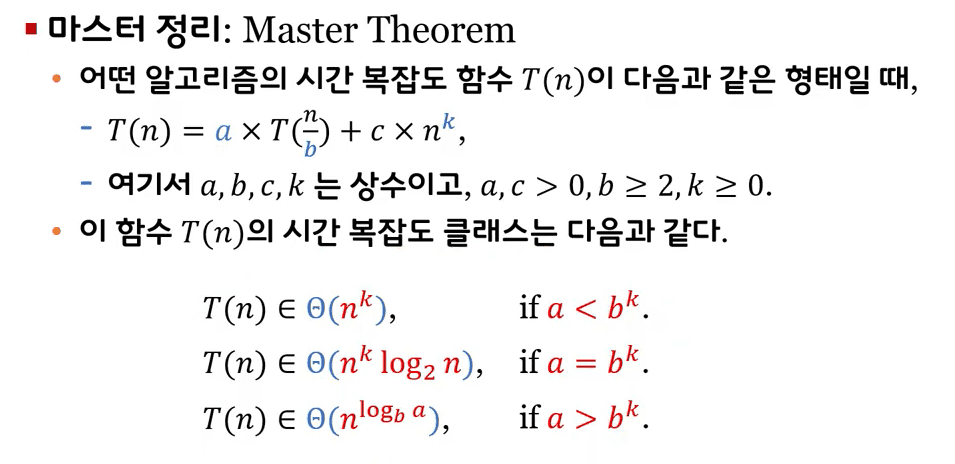
알고리즘 시간 복잡도 마스터하기 feat. 마스터 정리 (Master Theorem)
마스터 정리
-
마스터 정리(Master Theorem)는
재귀식으로 표현된 알고리즘의 시간 복잡도를 간단하게 계산하는 방법이다.
-
증명은 매우 어려우니 패스하고 다양한 예제에 적용시켜보자 !
-
-
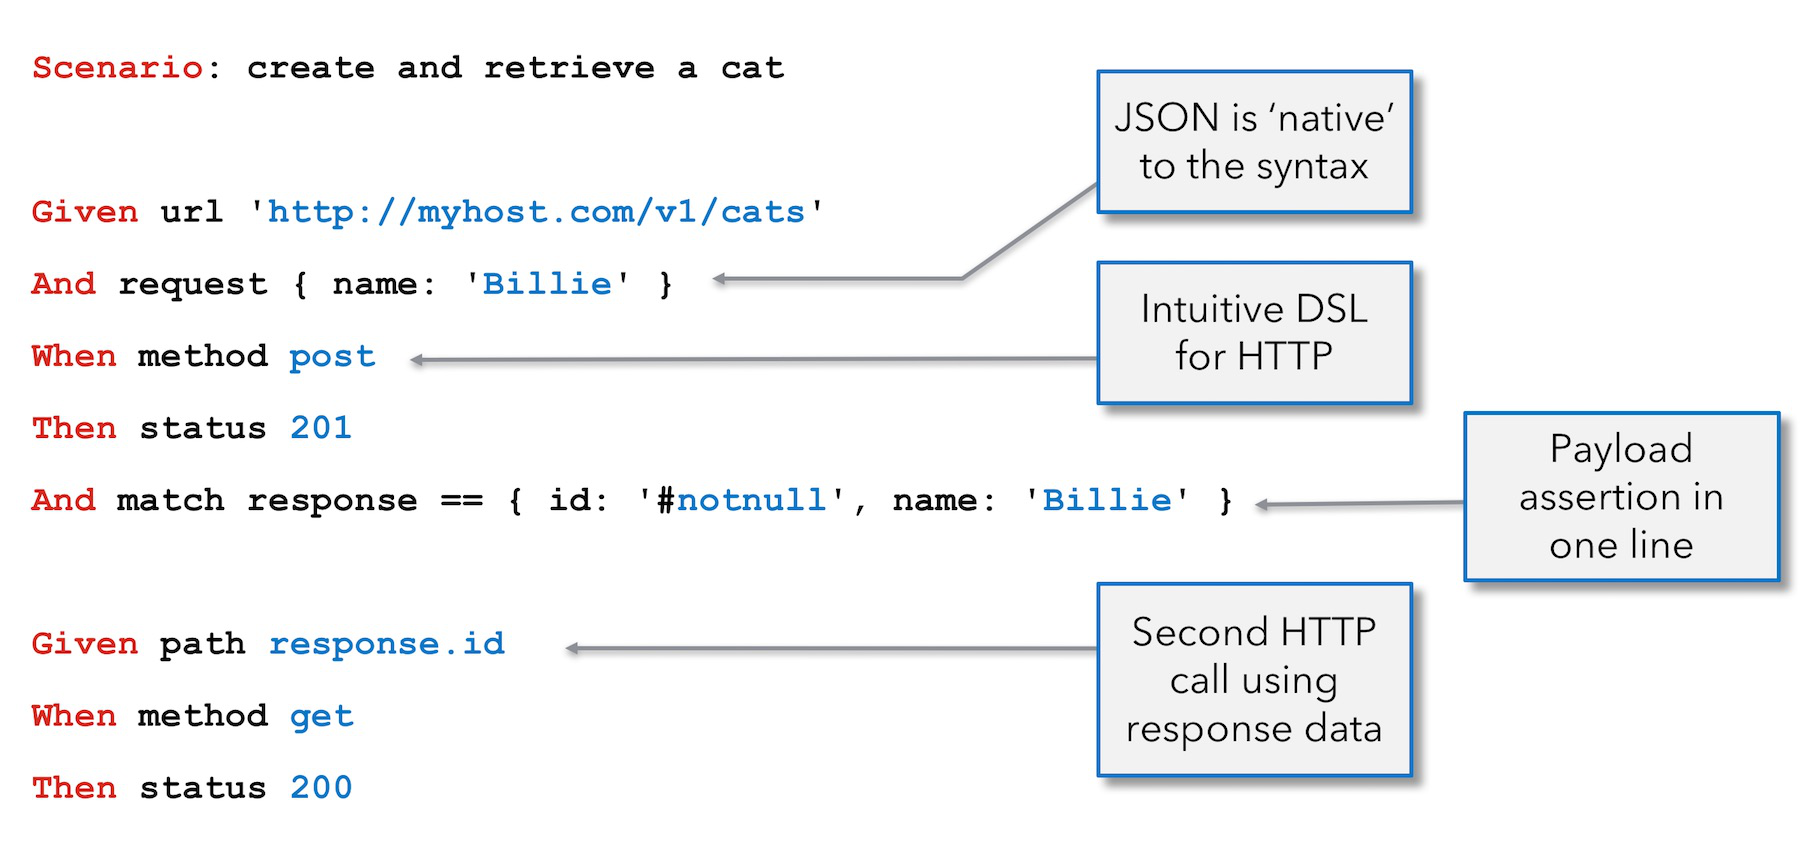
Karate Framework을 사용해 시나리오 테스트(Scenario Test)를 작성해보자 !
Karate Framework
Test Automation Made Simple.
Karate is the only open-source tool to combine API test-automation, mocks, performance-testing and even UI automation into a single, unified framework. The BDD syntax popularized by Cucumber is language-neutral, and easy for even non-programmers. Assertions and HTML reports are built-in, and you can run tests in parallel for speed.-
Karate 프레임워크는 BDD 기반의 Test Automation이 가능한 오픈 소스이다.
유저 입장에서의 Action을 정의해놓은 각 feature가 있고
해당 feature를 독립적 혹은 연속적으로 호출하여 원하는 결과를 확인할 수 있다.
Example
## 독립적
- 유저가 회원가입을 한다.

## 연속적
- 유저가 회원가입을 한다.
-> 회원 가입 성공 후 글을 작성한다.
-> 글 작성 후 글을 삭제한다.
-> 글 삭제 후 회원 탈퇴를 한다.
-> 동일 ID로 ID 찾기 시도 시 노출되지 않는다.
-
-
Let's write a scenario test using the Karate Framework !
Karate Framework
Test Automation Made Simple.
Karate is the only open-source tool to combine API test-automation, mocks, performance-testing and even UI automation into a single, unified framework. The BDD syntax popularized by Cucumber is language-neutral, and easy for even non-programmers. Assertions and HTML reports are built-in, and you can run tests in parallel for speed.-
Karate framework is an open source capable of BDD-based Test Automation.
There are each feature that defines the action from the user’s point of view
You can check the desired result by calling the feature as independent or continuously.
Example
## independent
- The user registers as a member.

## continuous
- The user registers as a member.
-> Write a post after successful membership registration.
-> Delete the post after writing.
-> After deleting the post, cancel the membership.
-> When trying to find an ID with the same ID, it is not exposed.
-
-
Spring Boot + QueryDSL + Gradle 6 + Multi Moudle 적용하기
Prologue
-
QueryDSL을 적용하는 방법에 대해 알아보자.
-
특히 QueryDSL에서 가장 큰 골칫덩이는 Gradle과의 호환성 문제이다.
그러므로 이 글에서는 Gradle 6.x.x으로 구현해본다.
-
- Cursor가 매일 수십억 건의 AI 코드 완성을 처리하는 방식
- A 레코드와 CNAME 레코드는 뭐가 다른걸까?
- 분산 시스템에서 순서가 보장되지 않은 이벤트를 다루는 전략
- DU(Disk Usage) 명령어를 아시나요?
- 2PC(Two-Phase Commit)란 무엇일까?
- DIG(Domain Information Groper) 명령어를 아시나요?
- 샤딩과 파티셔닝, 그 차이에 대하여
- LeetCode : 692. Top K Frequent Words
- Redis 서버에 접속중인 Client 목록 확인 방법
- LeetCode : 1299. Replace Elements with Greatest Element on Right Side
- Conference 11
- AlgorithmSkill 39
- DB 24
- Algorithm 175
- Crawling 1
- Node.js 15
- Linux 6
- AWS 11
- E.T.C 51
- Competition 5
- Python 26
- BlockChain 36
- MachineLearning 19
- 파일처리 14
- OS 12
- Server 31
- Docker 1
- Web 1
- JavaScript 18
- Network 39
- Git 6
- Technology 64
- DataStructure 1
- C/C++ 1
- HTTP 14
- Java 38
- Redis 9
- Retrospective 7
- Spring 72
- SpringBoot 16
- Kafka 26
- CleanCode 12
- TIL 4
- Blog 7
- Nginx 6
- MyBatis 6
- Regex 4
- EffectiveJava 2
- Spock 1
- Junit5 4
- Intellij 1
- CLI 1
- LeetCode 203
- MySQL 1
- JavaOptimizing 6
- Feign 1
- Karate 2
- Github 8
- SystemDesign 23
- Gradle 3
- Logback 3
- Kotlin 7
- CleanArchitecture 6
- Tech 6