Prologue
-
이번 글에서는 직접 SSL을 서버에 적용시켜 HTTPS 통신만 가능하게 설정을 해본다.
-
SSL에 대한 기본적인 개념과 동작 원리는 SSL(Secure Sockets Layer) 개념 및 동작 원리 알아보기 글을 참고하자.
SSL 적용
Step 0
-
OS : Ubuntu 18.04.3 LTS
-
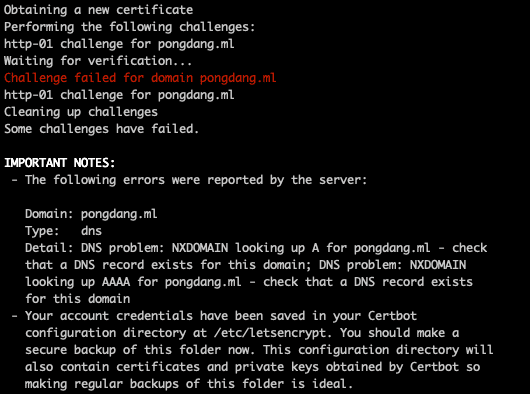
서버 인바운드에 443 포트를 허용시킨다.
만약 오픈하지 않고 진행할 경우 다음과 같은 에러가 발생한다.
-
Nginx에서 Proxy를 해야하기 때문에 Nginx 설치가 필요하다.
혹시 Nginx 설치가 되어 있지 않다면 Nginx 적용하기 글을 참고하자.
-
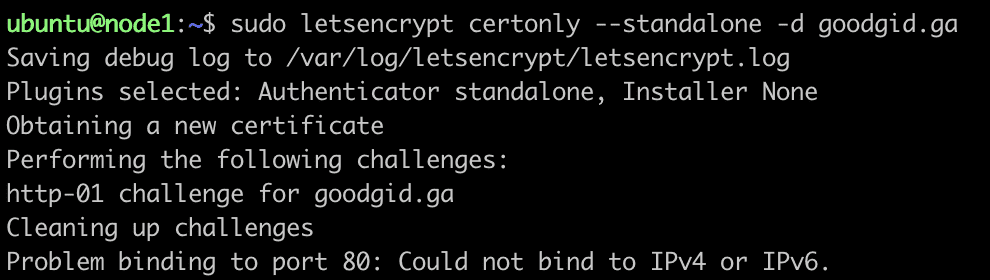
만약 Nginx가 동작중이라면 중지 시킨다.
Comman Line : sudo systemctl stop nginx
중지시키지 않고 SSL 인증서 발급을 시도하면 발급이 되지 않는다.
-
SSL 적용을 위해선 Domain Name이 필요하다.
혹시 Domain Nmae이 없다면 무료로 도메인(Domain) 신청 & 사용하기 글을 참고하자.
Step 1
- Ubuntu에서 letsencrypt를 설치한다.
sudo apt update -y
sudo apt install letsencrypt -y
Step 2
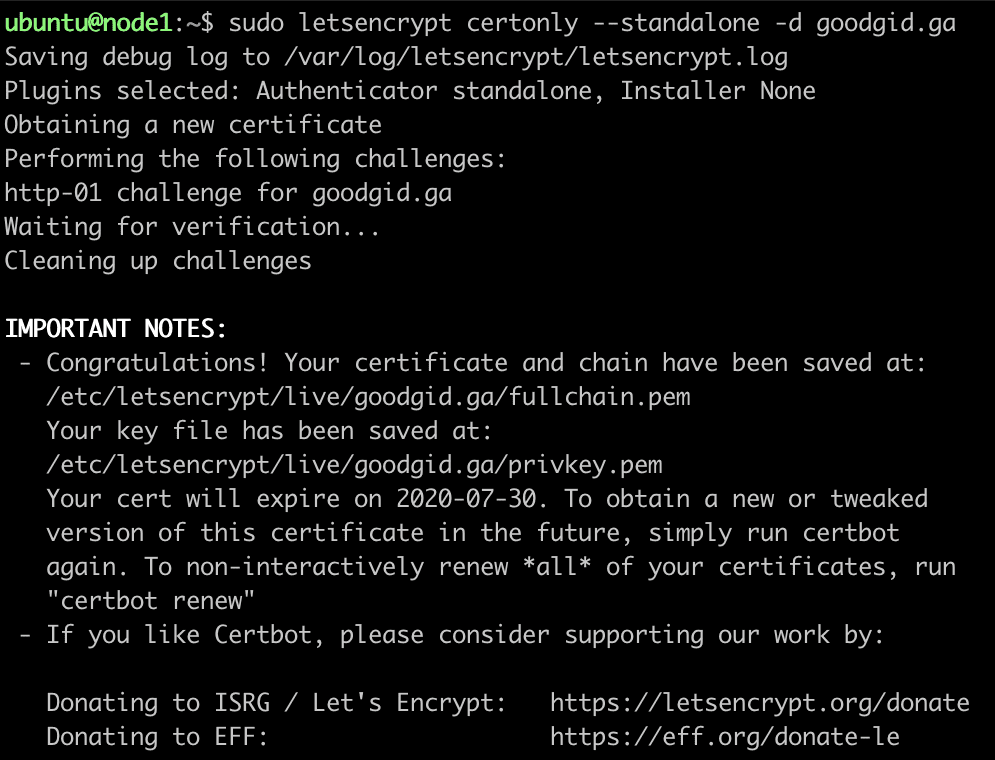
- SSL 인증서를 발급 받는다.
sudo letsencrypt certonly --standalone -d 도메인
ex) sudo letsencrypt certonly --standalone -d goodgid.ga
Step 3
- Nginx에 SSL을 적용 시킨다.
sudo vim /etc/nginx/sites-available/default
server {
  listen 443 ssl;
  server_name {{Domain Name}};
  # ex) server_name goodgid.ga;
  ssl_protocols TLSv1 TLSv1.1 TLSv1.2;
  ssl_ciphers HIGH:!aNULL:!eNULL:!EXPORT:!DES:!MD5:!PSK:!RC4:!DH;
  ssl_prefer_server_ciphers on;
  ssl_certificate /etc/letsencrypt/live/{{Domain Name}}/fullchain.pem;
  ssl_certificate_key /etc/letsencrypt/live/{{Domain Name}}/privkey.pem;

  # The nginx version is not specified in the response header Because of security.
  # default : on
  server_tokens off;

  # Protect XSS Attack
  add_header X-XSS-Protection "1; mode=block";

  location / {

    # Set Custom Header
    add_header author "goodGid";

    # If you want to request directly
    proxy_pass http://localhost:8080;

    # If you want to use Load Balancer
    # proxy_pass http://odot_servers;

    proxy_set_header X-Real-IP $remote_addr;
    proxy_set_header X-Forwarded-For $proxy_add_x_forwarded_for;
    proxy_set_header Host $http_host;

    # If 'access.log' file doesn't exist, it was automatically generated.
    # However, the 'nginx_log' directory must be created.
    access_log /home/ubuntu/.../nginx_log/access.log;
  }
}
Step 4
- Nginx를 재시작한다.
   sudo service nginx start
or sudo service nginx restart
Step 5
-
HTTPS가 정상적으로 적용 되었는지 체크해본다.
-
단 HTTP & 8080 포트 같은 경우에
서버 인바운드의 8080이 허용되어 있기 때문에 Success가 뜬다.
하지만 이 경우엔 Nginx를 통한 요청이 아니라 API 서버로 직접 요청을 하는 경우다.
# HTTP
http://goodgid.ga:80/health/check --> Fail
http://goodgid.ga:8080/health/check --> Fail
http://goodgid.ga:443/health/check --> Fail

# HTTPS
https://goodgid.ga:80/health/check --> Fail
https://goodgid.ga:8080/health/check --> Fail
https://goodgid.ga:443/health/check --> Success
Info
Let’s Encrypt
-
무료로 공인 SSL 인증서 사용을 가능하게 해준다.
-
인증서를 발급받기 위해서는 서비스 중인 도메인이 필요하다.
-
SSL의 유효기간은 3개월이다.
그렇기 때문에 3개월마다 연장을 해줘야한다.
인증서 갱신
$ certbot renew
- 만약 인증서 기간이 아직 유효하다면 다음과 같은 로그가 출력된다.
## Output
The following certs are not due for renewal yet:
  /etc/letsencrypt/live/goodgid.ga/fullchain.pem expires on 2020-07-30 (skipped)
No renewals were attempted.
인증서 강제 갱신
$ certbot renew --dry-run

## Output
new certificate deployed without reload, fullchain is
/etc/letsencrypt/live/goodgid.ga/fullchain.pem
CertBot
-
Step 2에서 발급받은 인증서를 삭제하는 방법은 다음과 같다.
-
자세한 내용은 Correct Way to Delete a Certbot SSL Certificate 글을 참고하자.
모든 인증서를 삭제
sudo certbot delete

특정 인증서 삭제
sudo certbot delete --cert-name example.com
Summary
-
서버에 HTTPS 통신이 가능하게 설정을 해보았다.
-
생각보다 손쉽게 적용이 가능하다.
-
그런데 특정 환경에서 깔끔하게 SSL 통신이 안되는 경우가 발생했다.
아무래도 인증서가 해당 CA 리스트에 등록이 되어있지 않아서 문제가 되는 것 같다.
무료로 사용하는 거 다 보니 이런 건 감수해야 할 부분인 것 같다.
아니면 내가 잘못 사용하고 있는 것일 수도 있다.
핸드폰 Safari 주소창에 https://goodgid.ga:443/health/check 입력하면 경고창이 뜨고 진입이 가능했다.
LINE App 채팅방에 https://goodgid.ga:443/health/check 입력하고 클릭하면 아예 443 요청이 가질 않았다.
KaKao Talk 채팅방에 https://goodgid.ga:443/health/check 입력하고 클릭하면 경고창이 뜨고 진입이 가능했다.